Monday, August 14, 2006
Auxiliary Baggage
When I ordered the fuselage kit I was still questioning if there would be enough room for adequate baggage, so I ordered the forward "Auxiliary Baggage Kit" - Plan 40. Its cheap. Since I plan to put the battery on the firewall freeing up the battery box for storage, and the rear storage area is bigger than I thought, I think there is enough room for my wife and I to travel with the things we want, without it. Looking at the kit however, it has become clear that it is very easy to install in such a way that it can be removed, leaving almost nothing behind and reinstalled for the occasional trip if I later decide I want it.
I thought it would be useful to put a few pictures here for any other prospective builder wrestling with the same issue.
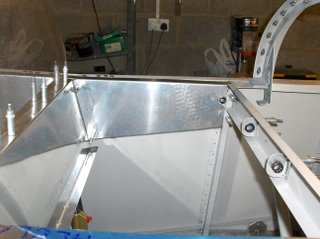 If you are not familiar with it, it is a drop down draw, located between the firewall and the F-402 bulkhead.
In this first picture you can see the frame that 'contains' the draw. (All the unprimed bits.) It is attached by 4 nutplates to the cross angle on the firewall and by two nutplates attached to ears at each end of the F-402. I do not plan to go beyond the stage where it would be easy to install the nutplates and drop the assembly in at a later date if I ever decide I want to use it. It lifts out quite easily.
I notice you can also see that I have a removable panel. It makes it smaller but I see it as a real advantage. I will return to that sometime.
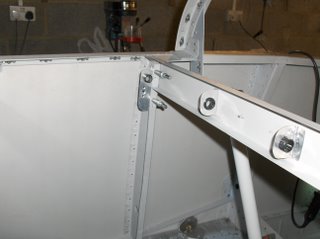
 In the picture to the right the draw is sitting roughly underneath where it would fit with a hinge along the lower left side and some sort of retaining system to control how far it opens. (VANS are not very clear about their ideas for that.)
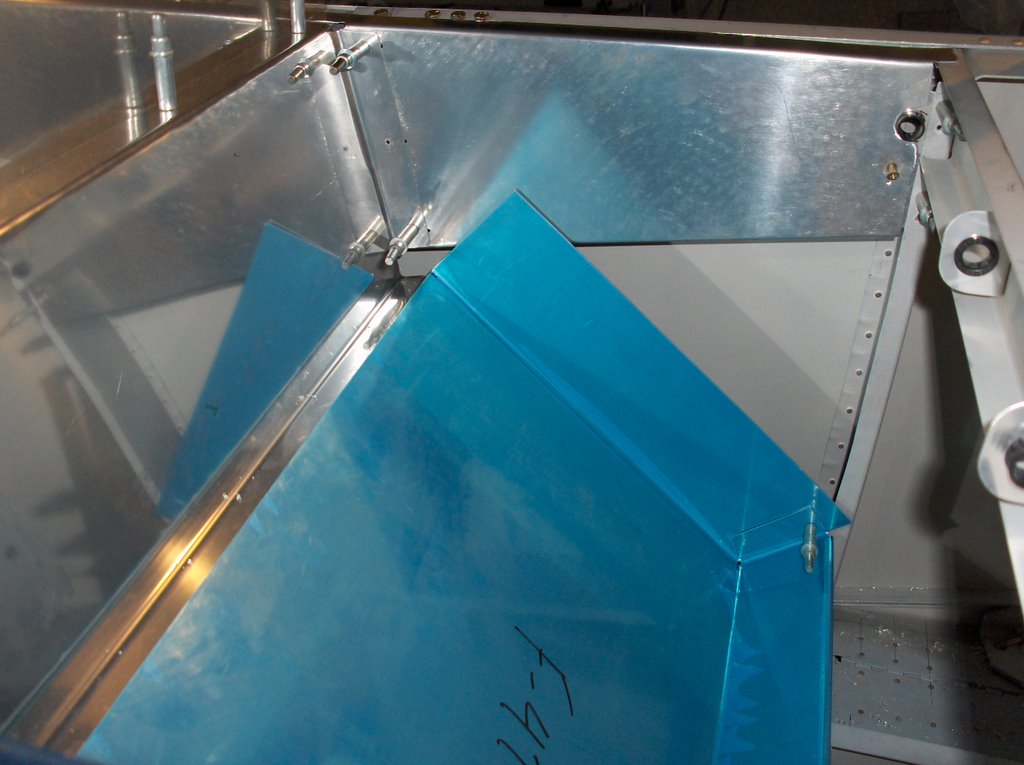
And in the third picture it is all removed, leaving just the 'ears' I installed to hold a nutplate. I wanted these anyway in preparation for the wiring loom. I plan that the loom will cross behind the F-402. I put some plastic thimbles in to make it clear what I mean.
I will finish the draw off in the next few days with clecos, and add a final picture, but then I will remove it.
The thing to remember is to try to keep the entire area it will occupy completely clear so it can easily be installed if I ever decide I want to. I think thplan might be somewhat compromised by the throttle and mixture cable but we will get to that in good time.
Postscript 27/2/10 - I was not impressed by this storage solution artall and never installed it at final assembly.
I thought it would be useful to put a few pictures here for any other prospective builder wrestling with the same issue.
 If you are not familiar with it, it is a drop down draw, located between the firewall and the F-402 bulkhead.
In this first picture you can see the frame that 'contains' the draw. (All the unprimed bits.) It is attached by 4 nutplates to the cross angle on the firewall and by two nutplates attached to ears at each end of the F-402. I do not plan to go beyond the stage where it would be easy to install the nutplates and drop the assembly in at a later date if I ever decide I want to use it. It lifts out quite easily.
I notice you can also see that I have a removable panel. It makes it smaller but I see it as a real advantage. I will return to that sometime.
 In the picture to the right the draw is sitting roughly underneath where it would fit with a hinge along the lower left side and some sort of retaining system to control how far it opens. (VANS are not very clear about their ideas for that.)
And in the third picture it is all removed, leaving just the 'ears' I installed to hold a nutplate. I wanted these anyway in preparation for the wiring loom. I plan that the loom will cross behind the F-402. I put some plastic thimbles in to make it clear what I mean.
I will finish the draw off in the next few days with clecos, and add a final picture, but then I will remove it.
The thing to remember is to try to keep the entire area it will occupy completely clear so it can easily be installed if I ever decide I want to. I think thplan might be somewhat compromised by the throttle and mixture cable but we will get to that in good time.
Postscript 27/2/10 - I was not impressed by this storage solution artall and never installed it at final assembly.
![]()